Stop the Drip: Expert Guide to Fixing a Kitchen Sink Leaking Under Sink
Discovering a kitchen sink leaking under sink can be a homeowner’s nightmare. That persistent drip, drip, drip isn’t just annoying; it can lead to water damage, mold growth, and wasted water. But don’t panic! This comprehensive guide will walk you through the process of identifying the source of the leak, understanding the potential causes, and, most importantly, providing you with step-by-step solutions to fix it. Whether you’re a seasoned DIY enthusiast or a first-time homeowner, we’ll equip you with the knowledge and confidence to tackle this common plumbing problem. We’ll delve into the common culprits behind kitchen sink leaks, from faulty plumbing connections to worn-out components, and provide detailed instructions, safety tips, and preventative measures to keep your kitchen dry and your water bill low. Let’s dive in and conquer that pesky kitchen sink leaking under sink!
Understanding the Anatomy of a Kitchen Sink and Its Plumbing
Before you can effectively troubleshoot a kitchen sink leaking under sink, it’s crucial to understand the basic components that make up your sink’s plumbing system. Familiarizing yourself with these parts will make it easier to identify the source of the leak and choose the appropriate repair method.
- Sink Basin: The visible bowl of the sink where you wash dishes.
- Drain Assembly: This includes the strainer (the part you see in the sink), the tailpiece (the pipe directly below the strainer), and the drainpipe that connects to the P-trap.
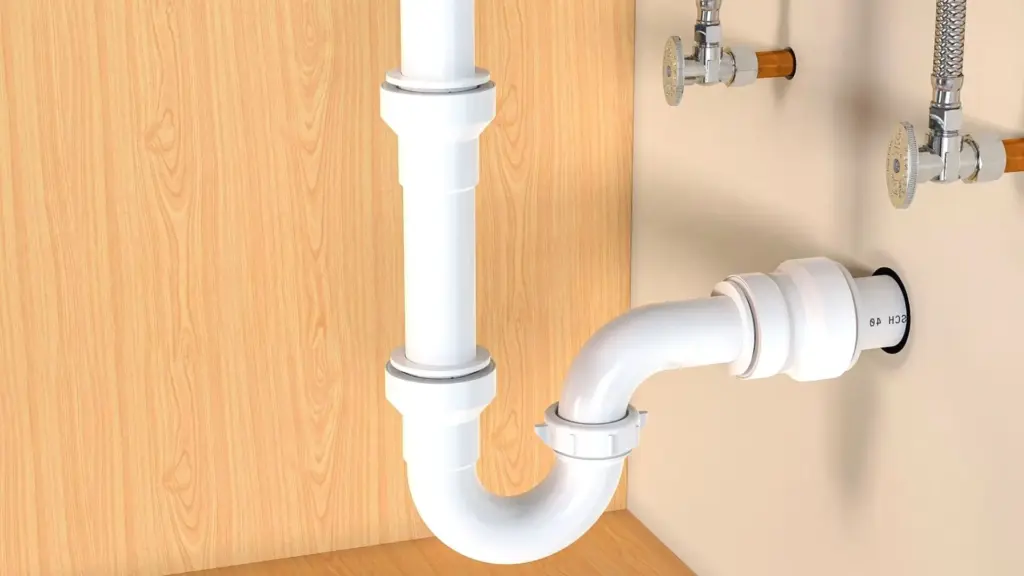
- P-Trap: The curved pipe under the sink designed to trap debris and prevent sewer gases from entering your home. It’s a common source of leaks.
- Waste Arm: The pipe that connects the P-trap to the drainpipe in the wall.
- Supply Lines: Flexible tubes that connect the shut-off valves to the faucet. These carry hot and cold water.
- Shut-Off Valves: Located under the sink, these valves control the water supply to the faucet. Knowing their location and how to use them is critical in an emergency.
- Faucet: The fixture that dispenses water into the sink. Leaks can occur around the base of the faucet, the spout, or the handles.
- Sprayer Hose (if applicable): A hose that extends from the faucet and provides a spray function.
Common Causes of a Kitchen Sink Leaking Under Sink
Pinpointing the cause of a kitchen sink leaking under sink is half the battle. Here are some of the most frequent culprits:
- Loose Connections: Over time, the connections between pipes and fittings can loosen due to vibrations or temperature changes.
- Corroded Pipes: Older pipes, especially those made of galvanized steel, are susceptible to corrosion, which can lead to leaks.
- Worn-Out Washers and O-Rings: These small rubber components are used to create watertight seals. They can dry out, crack, or deteriorate over time, causing leaks around faucets and drains.
- Damaged P-Trap: The P-trap can become damaged due to corrosion, impact, or clogs. Cracks or loose connections in the P-trap are common leak sources.
- Clogged Drains: A clogged drain can cause water to back up and put pressure on the pipes and connections, leading to leaks.
- Faulty Faucet: Leaks can occur within the faucet itself, due to worn-out cartridges, O-rings, or valve seats.
- Supply Line Issues: Supply lines can leak at the connections or develop cracks or pinholes in the hose itself.
- Sink Basin Seal: The seal between the sink basin and the countertop can deteriorate over time, allowing water to seep through.
Essential Tools and Materials for Fixing a Leaking Kitchen Sink
Before you start any repair work, gather the necessary tools and materials. Having everything on hand will make the process smoother and more efficient. Here’s a basic list:
- Basin Wrench: Used to loosen and tighten nuts in hard-to-reach places, such as those on the faucet.
- Pipe Wrench: For tightening or loosening larger pipes and fittings.
- Adjustable Wrench: A versatile wrench for various plumbing tasks.
- Channel-Lock Pliers: Useful for gripping and turning pipes and fittings.
- Screwdrivers (Phillips and Flathead): For removing screws on faucets and other components.
- Plumber’s Tape (Teflon Tape): Used to create watertight seals on threaded connections.
- Plumber’s Putty: For sealing the drain strainer to the sink basin.
- Replacement Washers and O-Rings: Have a variety on hand to match the ones you need to replace.
- New Supply Lines: If your supply lines are old or damaged, replace them.
- Bucket: To catch water during repairs.
- Towels or Rags: For cleaning up spills and drying parts.
- Penetrating Oil: To loosen stubborn nuts and bolts.
- Safety Glasses: To protect your eyes from debris.
- Gloves: To protect your hands.
- Flashlight or Headlamp: To provide adequate lighting under the sink.
Step-by-Step Guide to Diagnosing and Fixing a Kitchen Sink Leaking Under Sink
Now, let’s get to the heart of the matter: diagnosing and fixing that leak. Follow these steps carefully:
- Safety First: Turn Off the Water Supply: Locate the shut-off valves under the sink and turn them clockwise until they are completely closed. If you don’t have shut-off valves, you’ll need to turn off the main water supply to your house.
- Clear the Area: Remove everything from under the sink to give yourself plenty of room to work. Place a bucket under the area where you suspect the leak is coming from.
- Dry the Area: Use towels or rags to dry all the pipes, connections, and the surrounding area. This will make it easier to spot the source of the leak.
- Inspect the Faucet: Check around the base of the faucet, the spout, and the handles for any signs of water. If you see water, the leak may be coming from within the faucet itself.
- Examine the Supply Lines: Carefully inspect the supply lines for any cracks, pinholes, or leaks at the connections. Feel the lines for dampness.
- Check the Drain Assembly: Look at the strainer, tailpiece, and drainpipe for any signs of leaks. Pay close attention to the connections.
- Inspect the P-Trap: Examine the P-trap for cracks, loose connections, or signs of corrosion.
- Run the Water: With the area dry, turn on the water supply (slowly at first) and observe where the water is leaking from. This may require some patience and careful observation.
- Tighten Loose Connections: If you find any loose connections, use a wrench to gently tighten them. Be careful not to overtighten, as this can damage the pipes or fittings.
- Replace Washers and O-Rings: If you identify a leak coming from a faucet handle or spout, you may need to replace the washers or O-rings. Consult your faucet’s manual for instructions on how to disassemble and repair it.
- Repair or Replace the P-Trap: If the P-trap is cracked or damaged, you’ll need to replace it. You can purchase a new P-trap at most hardware stores.
- Replace Supply Lines: If the supply lines are leaking, it’s best to replace them. Disconnect the old lines and connect the new ones, making sure to use plumber’s tape on the threaded connections.
- Seal the Sink Basin: If the leak is coming from the seal between the sink basin and the countertop, you’ll need to remove the old sealant and apply a new bead of plumber’s putty or silicone caulk.
- Test Your Repair: After making any repairs, turn on the water supply and check for leaks. If you still see water, repeat the diagnosis process and try a different solution.
Specific Leak Scenarios and Their Solutions
Let’s look at some specific leak scenarios and the recommended solutions:
Leak at the Faucet Base
This often indicates a problem with the O-rings or cartridge inside the faucet. You’ll need to disassemble the faucet to access these parts. Turn off the water supply, remove the faucet handle, and carefully disassemble the faucet body. Replace any worn-out O-rings or the cartridge. Reassemble the faucet and test for leaks.
Leak at the Supply Line Connection
This is usually caused by a loose connection or a damaged supply line. Tighten the connection with a wrench, being careful not to overtighten. If the leak persists, replace the supply line. Make sure to use plumber’s tape on the threaded connections.
Leak at the P-Trap
This can be due to a loose connection, a crack in the P-trap, or a clog. Tighten the connections. If the P-trap is cracked, replace it. Also, check for clogs and clear them out. A clogged drain can put pressure on the P-trap and cause leaks.
Leak from the Sprayer Hose
If your kitchen sink has a sprayer, the hose can sometimes develop leaks. Inspect the hose for cracks or damage. Replace the hose if necessary. Also, check the connection at the faucet and tighten if needed.
Preventing Future Leaks: Maintenance Tips
Prevention is always better than cure. Here are some tips to prevent future kitchen sink leaks:
- Regularly Inspect Your Plumbing: Check under your sink every few months for any signs of leaks, corrosion, or loose connections.
- Tighten Loose Connections: Periodically tighten any loose connections you find.
- Replace Worn-Out Parts: Replace washers, O-rings, and supply lines as they age or show signs of wear.
- Avoid Harsh Drain Cleaners: Harsh drain cleaners can corrode pipes and damage seals. Use enzyme-based drain cleaners or a drain snake to clear clogs.
- Don’t Overload Your Sink: Avoid putting excessive weight or pressure on the sink basin, as this can damage the seal between the sink and the countertop.
- Flush with Hot Water: Periodically flush your drain with hot water to help prevent clogs.
Choosing the Right Plumber for Complex Repairs
While many kitchen sink leaks can be fixed with DIY methods, some repairs are best left to a professional plumber. If you’re uncomfortable working with plumbing, or if you’ve tried the above steps and the leak persists, it’s time to call in the experts. Complex issues like internal faucet problems, extensive pipe corrosion, or issues within the wall require specialized knowledge and tools. When choosing a plumber, look for someone licensed, insured, and experienced. Check online reviews and ask for recommendations from friends or family. A reputable plumber will be able to diagnose the problem accurately and provide a long-lasting solution.
Expert Insights on Common Plumbing Materials
Understanding the materials used in your kitchen sink plumbing can help you make informed decisions about repairs and replacements. Here’s a brief overview:
- PVC (Polyvinyl Chloride): A common plastic pipe used for drain lines. It’s inexpensive, durable, and easy to work with.
- CPVC (Chlorinated Polyvinyl Chloride): Similar to PVC but can withstand higher temperatures, making it suitable for hot water lines.
- PEX (Cross-linked Polyethylene): A flexible plastic tubing used for both hot and cold water lines. It’s resistant to freezing and bursting.
- Copper: A traditional plumbing material known for its durability and resistance to corrosion. Copper pipes are more expensive than plastic pipes.
- Galvanized Steel: An older type of pipe that is prone to corrosion. If you have galvanized steel pipes, consider replacing them with a more modern material.
Is it Time to Call a Plumber? Knowing When to Seek Professional Help
While DIY repairs are often possible, certain situations warrant professional plumbing assistance. If you encounter any of the following, it’s best to call a plumber:
- Persistent Leaks: If you’ve tried multiple DIY solutions and the leak continues, there may be a more complex underlying issue.
- Extensive Water Damage: If the leak has caused significant water damage, a plumber can assess the extent of the damage and recommend appropriate repairs.
- Hidden Leaks: If you suspect a leak within the walls or floors, a plumber can use specialized equipment to locate and repair the leak without causing unnecessary damage.
- No Shut-Off Valves: If you don’t have shut-off valves under your sink, turning off the main water supply can be inconvenient. A plumber can install shut-off valves for future convenience.
- Complex Plumbing Systems: If you have a complex plumbing system with multiple pipes and connections, it’s best to leave repairs to a professional.
Stopping the Drip: A Dry Kitchen is Within Reach
A kitchen sink leaking under sink, while frustrating, is a common problem that can often be resolved with a little knowledge and effort. By understanding the anatomy of your sink’s plumbing, identifying the potential causes of leaks, and following our step-by-step guide, you can confidently tackle many common repairs yourself. Remember to prioritize safety, gather the necessary tools, and don’t hesitate to call a professional when needed. By taking proactive steps to maintain your plumbing and address leaks promptly, you can prevent water damage, save money on your water bill, and enjoy a dry, functional kitchen for years to come. Share your experiences with fixing a kitchen sink leaking under sink in the comments below – your insights could help another homeowner!
