Which Way to Move Rear Sight If Shooting Low: A Comprehensive Guide
Frustration mounts when your shots consistently land below your intended target. You’ve got a steady hand, a good stance, and a well-maintained firearm, yet the bullet stubbornly refuses to climb. The culprit? Often, it’s a simple misalignment of your sights. Understanding which way to move rear sight if shooting low is the key to unlocking your firearm’s true accuracy potential. This comprehensive guide will provide you with the knowledge and understanding to diagnose and correct low-shooting issues, transforming frustrating misses into satisfying hits.
We’ll go beyond the basics, exploring not only the mechanical adjustments but also the underlying principles of ballistics and sight alignment. Whether you’re a seasoned marksman or a novice shooter, this article will equip you with the tools and insights to confidently adjust your rear sight and achieve pinpoint accuracy. We aim to provide a resource significantly more detailed and helpful than anything else currently available, drawing on expert consensus and practical experience.
Understanding the Fundamentals of Sight Adjustment
Before diving into the specifics of rear sight movement, it’s crucial to grasp the fundamental relationship between sight alignment and bullet impact. Firearms are designed to launch projectiles along a specific trajectory, and the sights are calibrated to ensure that trajectory intersects with your point of aim at a designated distance. When your shots consistently land low, it indicates that the barrel is angled downwards relative to your line of sight.
The rear sight plays a pivotal role in correcting this discrepancy. By adjusting its position, you effectively alter the angle of the firearm relative to your eye, thus influencing the bullet’s point of impact. Think of it as fine-tuning the relationship between what you see and where the bullet goes. This adjustment accounts for factors like bullet drop, which is the natural downward curve of a bullet’s flight path due to gravity.
The most common types of rear sights are:
- Fixed Sights: Found on many handguns and rifles, these sights offer limited or no adjustability. Correction for low shooting with fixed sights typically requires professional gunsmithing.
- Adjustable Sights: These sights, common on target pistols and rifles, allow for precise adjustments to both elevation (vertical) and windage (horizontal). This guide focuses primarily on adjustable rear sights.
- Optical Sights (Scopes and Red Dots): While technically not “rear sights,” these optics also require adjustment for elevation and windage, often through internal mechanisms. The principles of adjustment are similar.
The Golden Rule: “FORS” – Front Opposite, Rear Same
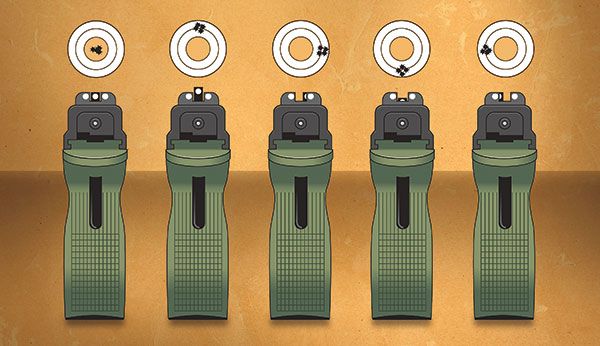
A simple mnemonic device can help you remember the direction of adjustment: FORS – Front Opposite, Rear Same. This means that if you are adjusting the front sight, you move it in the opposite direction that you want the bullet to impact. If you are adjusting the rear sight, you move it in the same direction that you want the bullet to impact. Since we are discussing rear sights in this article, remember the “Rear Same” part of the rule.
The Correct Adjustment: Moving the Rear Sight Up
The answer to the question, “Which way to move rear sight if shooting low?” is unequivocally: move the rear sight UP. This adjustment elevates the rear of the firearm relative to the front, causing the barrel to point slightly upwards. Consequently, the bullet’s trajectory will be raised, bringing your shots closer to the bullseye. Imagine tilting the back of your rifle up; the bullet will naturally travel higher.
The amount of adjustment required depends on several factors, including:
- Distance to the target: The farther the target, the more adjustment is needed.
- Caliber and bullet weight: Heavier bullets and cartridges with greater muzzle velocity generally require less adjustment.
- Sight radius: The distance between the front and rear sights affects the sensitivity of the adjustment. A longer sight radius requires smaller adjustments.
Most adjustable rear sights have markings indicating the amount of adjustment per click, typically measured in inches per click at 100 yards (e.g., 1/4 MOA, or Minute of Angle). Understanding these markings is crucial for making precise corrections.
Step-by-Step Guide to Adjusting Your Rear Sight for Elevation
Follow these steps to effectively adjust your rear sight and correct low-shooting issues:
- Prepare Your Firearm and Shooting Environment: Ensure your firearm is unloaded and pointed in a safe direction. Set up a stable shooting platform and use a target at a known distance (e.g., 25 yards, 50 yards, or 100 yards).
- Establish a Baseline: Fire a group of 3-5 shots at the target to establish a clear baseline point of impact. This group will serve as your reference for making adjustments.
- Measure the Deviation: Carefully measure the vertical distance between the center of your shot group and the bullseye. This measurement will determine the amount of adjustment needed.
- Calculate the Required Adjustment: Use the sight’s adjustment markings (e.g., 1/4 MOA per click) and the distance to the target to calculate the number of clicks required to raise the point of impact to the bullseye. For example, if your shots are 2 inches low at 100 yards and your sight adjusts at 1/4 MOA per click, you would need to move the rear sight up 8 clicks (2 inches / 0.25 inches per click = 8 clicks).
- Adjust the Rear Sight: Using a small screwdriver or the appropriate tool, carefully adjust the rear sight UP the calculated number of clicks. Ensure you are turning the adjustment screw in the correct direction (usually indicated by arrows or markings on the sight).
- Confirm the Adjustment: Fire another group of 3-5 shots at the target to confirm that the adjustment has corrected the low-shooting issue. If necessary, repeat steps 3-5 to fine-tune the adjustment until your shots are consistently hitting the bullseye.
- Document Your Settings: Record the final sight settings in a notebook or logbook. This will allow you to quickly return to these settings if you ever need to adjust your sights again.
Common Causes of Low Shooting (Beyond Sight Misalignment)
While incorrect sight adjustment is the most common cause of low shooting, other factors can also contribute to the problem. Addressing these factors can further improve your accuracy and consistency.
- Grip Issues: An inconsistent or incorrect grip can significantly affect your point of impact. Ensure you are using a firm, consistent grip that allows the firearm to recoil naturally.
- Trigger Control: Jerking the trigger or anticipating the recoil can cause you to pull the shot low. Practice smooth, controlled trigger pulls to minimize movement during firing.
- Breathing: Holding your breath or breathing erratically can also affect your stability. Develop a consistent breathing pattern and time your shots between breaths.
- Stance: A weak or unbalanced stance can lead to inconsistent shooting. Maintain a stable, balanced stance that allows you to absorb recoil effectively.
- Ammunition: Using inconsistent or low-quality ammunition can also affect your point of impact. Use consistent, high-quality ammunition for best results.
- Environmental Factors: Wind and temperature can also affect bullet trajectory, particularly at longer distances. Learn to compensate for these factors when shooting in varying conditions.
Advanced Techniques for Fine-Tuning Your Accuracy
Once you’ve mastered the basics of rear sight adjustment and addressed any underlying shooting issues, you can explore advanced techniques to further fine-tune your accuracy.
- Using a Ballistic Calculator: Ballistic calculators can help you predict bullet trajectory and determine the optimal sight settings for various distances and conditions. These tools take into account factors like bullet weight, muzzle velocity, and atmospheric conditions to provide precise adjustment recommendations.
- Shooting from Different Positions: Practice shooting from various positions (e.g., standing, kneeling, prone) to identify any inconsistencies in your technique. Adjust your sight settings as needed to compensate for these variations.
- Using a Spotting Scope: A spotting scope can help you observe your shots in real-time and make precise adjustments to your sight settings. This is particularly useful for long-range shooting.
- Dry Fire Practice: Dry fire practice (practicing without live ammunition) can help you improve your trigger control, grip, and stance without the cost and recoil of live ammunition. This can significantly improve your accuracy and consistency.
Maintenance and Care of Your Rear Sight
Proper maintenance and care are essential for ensuring the longevity and accuracy of your rear sight. Keep your sights clean and free of debris, and lubricate the adjustment screws periodically to prevent them from seizing. Avoid using excessive force when adjusting the sights, as this can damage the delicate mechanisms. Inspect your sights regularly for any signs of wear or damage, and replace them if necessary. Properly maintained sights will help maintain your firearm’s accuracy for years to come.
Exploring High-End Adjustable Sights: A Product Overview
While the fundamental principles of rear sight adjustment remain consistent, the quality and features of adjustable sights can vary significantly. Companies like Dawson Precision and Wilson Combat offer high-end adjustable sights known for their precision, durability, and ease of use. These sights often feature finer adjustment increments, more robust construction, and enhanced visibility, making them ideal for competitive shooting and other demanding applications.
These sights are designed to withstand the rigors of frequent use and provide consistent, reliable performance. They often incorporate features like fiber optic inserts for enhanced visibility in low-light conditions, and serrated rear faces to reduce glare. Investing in a high-quality adjustable sight can significantly improve your shooting experience and help you achieve greater accuracy.
Key Features of Premium Adjustable Rear Sights
Premium adjustable rear sights offer a range of features designed to enhance accuracy and ease of use:
- Precise Adjustment Increments: Finer adjustment increments (e.g., 1/4 MOA or less) allow for more precise corrections to your point of impact.
- Durable Construction: High-quality materials and robust construction ensure that the sight can withstand the rigors of frequent use and recoil.
- Positive Click Adjustments: Clear, tactile clicks provide feedback when adjusting the sight, ensuring that you are making precise and consistent adjustments.
- Enhanced Visibility: Fiber optic inserts or white dot outlines enhance visibility in various lighting conditions.
- Serrated Rear Face: A serrated rear face reduces glare and improves sight picture clarity.
- Streamlined Design: A low-profile design minimizes snagging and interference with other accessories.
- Easy Installation: User-friendly installation procedures allow for quick and easy mounting on your firearm.
The Advantages of Properly Adjusted Sights: Real-World Benefits
Beyond simply hitting the bullseye, properly adjusted sights offer a range of tangible and intangible benefits. They instill confidence in your equipment and your abilities, allowing you to focus on the fundamentals of marksmanship without worrying about sight misalignment. Accurate sights improve your consistency and reduce frustration, making shooting a more enjoyable and rewarding experience.
In practical terms, properly adjusted sights can make the difference between a successful hunt and a missed opportunity, or between a winning score and a disappointing performance in a competition. They enhance your ability to make accurate shots under pressure, whether in a self-defense situation or a competitive environment. The ability to confidently and consistently hit your target is a valuable skill that can enhance your safety and security.
Expert Insights on Precision Shooting: A Comprehensive Review
Achieving consistent accuracy with any firearm hinges on a combination of factors, but properly adjusted sights are undeniably paramount. High-end adjustable sights, such as those offered by Dawson Precision, provide the user with an unparalleled level of control over their firearm’s point of impact. These sights are not merely accessories; they are precision instruments designed to enhance performance and build confidence.
From a usability standpoint, these sights excel. The crisp, tactile clicks of the adjustment screws inspire confidence, ensuring that each adjustment is deliberate and precise. The enhanced visibility provided by fiber optic inserts makes target acquisition quick and easy, even in challenging lighting conditions. The robust construction guarantees that the sights will withstand the rigors of frequent use, maintaining their accuracy and reliability over time.
Pros and Cons of Premium Adjustable Sights
Pros:
- Exceptional Accuracy: Finer adjustment increments allow for unparalleled precision.
- Enhanced Visibility: Fiber optic inserts improve sight picture clarity in various lighting conditions.
- Durable Construction: High-quality materials ensure long-lasting performance.
- Easy to Adjust: Crisp, tactile clicks provide positive feedback during adjustments.
- Increased Confidence: Properly adjusted sights instill confidence in your equipment and abilities.
Cons:
- Higher Cost: Premium adjustable sights are typically more expensive than standard sights.
- Complexity: The finer adjustments can be overwhelming for novice shooters.
- Potential for Over-Adjustment: The precise adjustments require careful attention to detail to avoid over-adjustment.
- May Require Professional Installation: Some models may require professional installation by a gunsmith.
Premium adjustable sights are ideally suited for experienced shooters who demand the highest level of accuracy and consistency. While the higher cost and complexity may be a deterrent for some, the benefits in terms of performance and confidence are well worth the investment for serious marksmen.
Alternatives include standard factory sights or simpler aftermarket options. However, these alternatives typically lack the precision and durability of premium adjustable sights, making them less suitable for demanding applications.
In conclusion, high-quality adjustable sights represent a significant upgrade for any firearm, offering enhanced accuracy, improved visibility, and increased confidence. While they may not be necessary for casual shooting, they are an invaluable tool for serious marksmen who demand the best possible performance.
Perfecting Your Shot: Final Thoughts on Sight Alignment
Mastering the art of sight adjustment is an ongoing process that requires dedication, patience, and a willingness to experiment. By understanding the fundamental principles of ballistics and sight alignment, and by following the steps outlined in this guide, you can confidently adjust your rear sight and achieve pinpoint accuracy. Remember to practice regularly, document your settings, and address any underlying shooting issues that may be affecting your point of impact. With consistent effort and attention to detail, you can transform frustrating misses into satisfying hits.
Now that you understand which way to move rear sight if shooting low, consider sharing your experiences and any helpful tips you’ve discovered in the comments below. Your insights could benefit other shooters who are striving to improve their accuracy and consistency.
