Unlocking the Perfect Finish: Lacquer, Satin, and Semi-Gloss Paints for Wood Cabinets
Choosing the right paint for your wood cabinets can dramatically transform your kitchen or bathroom, breathing new life into your space. But with so many options available, navigating the world of finishes – specifically lacquer, satin, and semi-gloss – can feel overwhelming. What are the key differences? Which is the most durable? And how do you achieve a professional-looking result? This comprehensive guide will demystify the choices, providing you with the expert knowledge you need to select the perfect paint for your wood cabinets.
We’ll delve into the unique characteristics of each finish, exploring their pros and cons, ideal applications, and essential preparation techniques. Whether you’re a seasoned DIY enthusiast or a first-time renovator, this article will equip you with the confidence and skills to achieve a beautiful and long-lasting finish on your wood cabinets. Get ready to discover the secrets to achieving that showroom-worthy look, right in your own home.
Understanding the Nuances of Cabinet Paint Finishes
The finish of your cabinet paint is more than just aesthetics; it dictates the durability, cleanability, and overall feel of your kitchen or bathroom. Lacquer, satin, and semi-gloss each offer distinct advantages and disadvantages. Let’s explore each in detail.
Lacquer: The Professional’s Choice
Lacquer is a solvent-based finish known for its exceptional hardness, durability, and smooth, glass-like appearance. It’s a popular choice among professional cabinet makers due to its resistance to scratches, stains, and chemicals. Lacquer dries incredibly quickly, allowing for faster project completion. However, its application requires specialized equipment and proper ventilation due to its strong fumes.
Lacquer is available in various sheens, from matte to high-gloss, offering versatility in design. Its ability to create a flawless, factory-finished look makes it a top contender for high-end cabinetry. However, it’s important to note that lacquer can be more brittle than other finishes and may be prone to cracking or chipping in high-impact areas. Proper surface preparation is crucial for ensuring optimal adhesion and longevity.
Satin: The Balanced Option
Satin paint offers a smooth, velvety finish with a subtle sheen. It strikes a balance between durability and aesthetics, making it a popular choice for a wide range of applications, including kitchen and bathroom cabinets. Satin is more forgiving than higher-gloss finishes, as it tends to hide imperfections and brushstrokes more effectively.
Its moderate sheen provides a touch of elegance without being overly reflective. Satin paint is relatively easy to clean and maintain, making it a practical choice for busy households. While it’s not as durable as lacquer or semi-gloss, it offers good resistance to scratches and stains, especially when paired with a high-quality primer and topcoat. Satin’s versatility and ease of application make it an excellent option for DIYers.
Semi-Gloss: The Durable and Easy-to-Clean Finish
Semi-gloss paint boasts a higher sheen than satin, providing a more reflective and durable surface. Its glossy finish makes it incredibly easy to clean, making it an ideal choice for areas prone to splashes, spills, and grime. Semi-gloss is highly resistant to moisture and mildew, making it well-suited for bathrooms and kitchens.
However, its high sheen also accentuates imperfections, requiring meticulous surface preparation to achieve a flawless finish. Brushstrokes are more visible with semi-gloss paint, so proper application techniques are essential. While it’s not as sophisticated as lacquer, semi-gloss offers excellent durability and ease of maintenance, making it a practical choice for high-traffic areas.
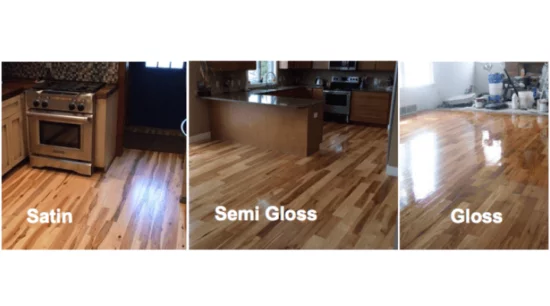
The Science Behind the Sheen: Understanding Light Reflectance
The perceived sheen of a paint finish is directly related to its light reflectance value (LRV). LRV measures the percentage of light that a surface reflects. A higher LRV indicates a glossier finish, while a lower LRV indicates a matte finish.
- Lacquer: Offers a wide range of LRVs, from matte (very low LRV) to high-gloss (very high LRV).
- Satin: Typically has a moderate LRV, providing a subtle sheen without being overly reflective.
- Semi-Gloss: Has a higher LRV than satin, resulting in a more reflective and glossy surface.
Understanding LRV can help you choose the right finish for your desired aesthetic and functional needs. For example, if you want to brighten a dark kitchen, a semi-gloss finish can help reflect more light and create a more open and airy feel.
Primer: The Unsung Hero of Cabinet Painting
Regardless of the finish you choose, primer is an essential step in achieving a professional-looking and long-lasting result. Primer provides a smooth, uniform surface for the paint to adhere to, ensuring optimal coverage and durability. It also helps to block stains, prevent tannin bleed-through, and improve the overall appearance of the finished product.
There are several types of primers available, each designed for specific purposes. For wood cabinets, an oil-based or shellac-based primer is often recommended, as they provide excellent adhesion and stain-blocking properties. Water-based primers are also available, but they may not be as effective at preventing tannin bleed-through on certain types of wood.
When choosing a primer, consider the type of wood you’re working with, the existing finish (if any), and the type of paint you’ll be using. Always follow the manufacturer’s instructions for application and drying time.
Spray vs. Brush: Choosing the Right Application Method
The application method you choose can significantly impact the final appearance of your cabinets. Spraying provides a smooth, even finish with minimal brushstrokes, while brushing is a more traditional method that can be done with basic tools.
Spraying: Achieving a Factory Finish
Spraying is the preferred method for achieving a flawless, factory-finished look, especially with lacquer. It allows for even coverage and minimizes brushstrokes. However, spraying requires specialized equipment, such as an airless sprayer or HVLP (high-volume, low-pressure) sprayer, and proper ventilation. Masking off the surrounding area is also essential to prevent overspray.
Spraying is best suited for experienced DIYers or professionals who have the necessary equipment and skills. It’s also a faster method for painting large surfaces, such as cabinet doors and drawer fronts.
Brushing: A Traditional Approach
Brushing is a more traditional method that can be done with basic tools, such as a high-quality paintbrush. It’s a more accessible option for DIYers who don’t have access to spraying equipment. However, brushing can leave brushstrokes, especially with higher-gloss finishes. Proper brushing techniques, such as feathering and using a wet edge, can help minimize brushstrokes.
Brushing is best suited for smaller projects or for areas where spraying is not practical. It’s also a good option for applying primer or for creating a textured finish.
Step-by-Step Guide to Painting Wood Cabinets: Achieving Professional Results
Painting wood cabinets can be a rewarding DIY project, but it requires careful preparation and attention to detail. Here’s a step-by-step guide to help you achieve professional results:
- Remove hardware: Remove all knobs, pulls, hinges, and other hardware from the cabinets.
- Clean the cabinets: Thoroughly clean the cabinets with a degreaser to remove any grease, dirt, or grime.
- Sand the cabinets: Sand the cabinets with fine-grit sandpaper to create a smooth, even surface for the primer to adhere to.
- Apply primer: Apply a thin, even coat of primer to the cabinets, following the manufacturer’s instructions.
- Sand the primer: Once the primer is dry, lightly sand it with fine-grit sandpaper to remove any imperfections.
- Apply paint: Apply two thin, even coats of paint to the cabinets, allowing each coat to dry completely before applying the next.
- Reinstall hardware: Once the paint is dry, reinstall the hardware.
Following these steps will help you achieve a beautiful and long-lasting finish on your wood cabinets.
Addressing Common Cabinet Painting Challenges
Even with careful preparation, you may encounter some challenges during the cabinet painting process. Here are some common issues and how to address them:
- Brushstrokes: Minimize brushstrokes by using a high-quality paintbrush, feathering your strokes, and maintaining a wet edge.
- Runs and drips: Prevent runs and drips by applying thin, even coats of paint and avoiding over-application.
- Uneven coverage: Ensure even coverage by applying two thin coats of paint and allowing each coat to dry completely before applying the next.
- Peeling paint: Prevent peeling paint by properly preparing the surface, using a high-quality primer, and allowing the paint to dry completely before reinstalling the hardware.
Lacquer vs. Pre-catalyzed Lacquer: A Deeper Dive
Within the realm of lacquer finishes, pre-catalyzed lacquer stands out as a notable variation. Unlike traditional lacquer, which requires the addition of a catalyst just before application, pre-catalyzed lacquer has the catalyst already incorporated. This offers several advantages, including ease of use and consistency. It typically exhibits enhanced durability and chemical resistance compared to standard lacquer, making it a preferred choice for high-use cabinets. However, it often comes at a higher cost and may have a shorter shelf life once opened.
The Environmental Factor: VOCs and Low-VOC Options
Volatile Organic Compounds (VOCs) are chemicals released into the air during the painting process. They can contribute to air pollution and pose health risks. Traditional solvent-based lacquers tend to have higher VOC levels compared to water-based paints. However, low-VOC and zero-VOC options are increasingly available for both paints and lacquers. These formulations minimize the release of harmful chemicals, making them a more environmentally friendly and healthier choice. When selecting your cabinet finish, consider the VOC content and opt for low-VOC options whenever possible.
Cost Comparison: Balancing Budget and Quality
The cost of different cabinet paint finishes can vary significantly. Lacquer, especially when professionally applied, tends to be the most expensive option due to the specialized equipment and expertise required. Semi-gloss and satin paints are generally more affordable, especially for DIY projects. However, it’s important to factor in the cost of primer, brushes, rollers, and other supplies when calculating the overall cost. While it may be tempting to opt for the cheapest option, investing in high-quality paint and supplies will ultimately result in a more durable and aesthetically pleasing finish.
Revitalizing Your Kitchen: Choosing the Right Paint for Your Cabinets
Selecting the right paint finish for your wood cabinets is a crucial decision that impacts both the aesthetics and longevity of your kitchen or bathroom. Lacquer offers unparalleled durability and a flawless finish, while satin provides a balanced approach with its subtle sheen and ease of application. Semi-gloss offers excellent cleanability and moisture resistance, making it ideal for high-traffic areas. By understanding the unique characteristics of each finish and considering your specific needs and preferences, you can confidently choose the perfect paint for your wood cabinets and transform your space.
Ready to take the next step? Share your cabinet painting project plans or any questions you have in the comments below. We’re here to help you achieve a stunning and durable finish that you’ll love for years to come!
