Craft a Heartfelt Masterpiece: How to Make a Pop-Up Card for Mother’s Day
Mother’s Day is a time to show your appreciation for the incredible women in our lives. While store-bought cards are readily available, nothing conveys sincerity quite like a handmade gift. This comprehensive guide will walk you through the process of creating a stunning pop-up card for Mother’s Day, transforming simple paper into a cherished keepsake. We’ll cover everything from basic techniques to advanced designs, ensuring you can create a card that perfectly reflects your love and admiration. Get ready to unleash your creativity and craft a truly unforgettable Mother’s Day surprise.
The Enduring Appeal of Handmade Pop-Up Cards
The art of paper engineering, or kirigami, has a rich history dating back centuries. Pop-up cards, in particular, offer a unique blend of artistry and engineering, transforming a flat surface into a three-dimensional surprise. Their enduring appeal lies in their ability to evoke joy and wonder. Unlike mass-produced cards, a handmade pop-up card carries a personal touch, reflecting the time, effort, and love invested in its creation. This personalized element makes it a truly special and meaningful gift.
Creating pop-up cards is more than just a craft; it’s an expression of creativity and a tangible demonstration of affection. The recipient recognizes the effort involved, adding to the emotional value of the gift. The surprise element of the pop-up mechanism further enhances the experience, making it a memorable and cherished keepsake. Whether you’re a seasoned crafter or a beginner, the satisfaction of creating a beautiful, personalized card is unparalleled.
Essential Tools and Materials for Pop-Up Card Making
Before embarking on your pop-up card journey, gather the necessary tools and materials. Having everything readily available will streamline the process and ensure a smooth crafting experience. Here’s a comprehensive list of essentials:
- Cardstock: Choose a variety of colors and textures to add visual interest to your card. Heavier cardstock (65-100 lb) is recommended for the base of the card to provide stability.
- Paper: Use lighter-weight paper for the pop-up elements to allow for easier folding and manipulation.
- Craft Knife or Scalpel: A sharp craft knife or scalpel is essential for precise cutting. Always use a cutting mat to protect your work surface.
- Cutting Mat: A self-healing cutting mat provides a safe and durable surface for cutting.
- Ruler: A metal ruler is ideal for accurate measurements and straight lines.
- Pencil: Use a pencil for sketching designs and marking cutting lines.
- Eraser: An eraser is essential for correcting mistakes and removing pencil marks.
- Scissors: Scissors are useful for cutting larger shapes and trimming edges.
- Glue or Adhesive: Choose a strong adhesive that dries clear, such as glue sticks, double-sided tape, or liquid glue.
- Bone Folder: A bone folder helps create crisp, clean folds.
- Embellishments: Add decorative elements such as ribbons, buttons, glitter, and stickers to personalize your card.
Mastering Basic Pop-Up Techniques
Several fundamental techniques form the foundation of pop-up card making. Mastering these techniques will enable you to create a wide range of designs. Let’s explore some of the most essential ones:
The Basic 90-Degree Pop-Up
This is the simplest and most fundamental pop-up technique. It involves creating a rectangular tab that folds out at a 90-degree angle when the card is opened. Here’s how to do it:
- Cut a rectangle of paper.
- Fold the rectangle in half.
- Make two parallel cuts along the fold line, creating a tab.
- Open the rectangle and fold the tab outwards, creating a 90-degree angle.
- Attach the sides of the rectangle to the inside of your card.
The V-Fold Pop-Up
The V-fold pop-up creates a more dynamic and visually appealing effect. It involves creating a V-shaped fold that pops up when the card is opened. Here’s how to do it:
- Cut a rectangle of paper.
- Fold the rectangle in half.
- Make two angled cuts along the fold line, creating a V shape.
- Open the rectangle and fold the V shape outwards.
- Attach the sides of the rectangle to the inside of your card.
The Box Pop-Up
The box pop-up creates a three-dimensional box that pops up when the card is opened. This technique is ideal for creating more elaborate and intricate designs. Here’s how to do it:
- Cut two identical rectangles of paper.
- Fold each rectangle in half.
- On one rectangle, make two parallel cuts along the fold line, creating a tab.
- On the other rectangle, make two parallel cuts along the fold line, creating a tab that is the same size as the first tab.
- Open both rectangles and fold the tabs outwards.
- Attach the tabs to each other, forming a box shape.
- Attach the sides of the box to the inside of your card.
Designing Your Mother’s Day Pop-Up Card: Inspiration and Ideas
Now that you’ve mastered the basic techniques, it’s time to unleash your creativity and design your Mother’s Day pop-up card. Consider your mother’s interests, hobbies, and personality when choosing a theme and design. Here are some inspiring ideas to get you started:
- Flowers: A classic and timeless choice, flowers are always a welcome gift. Create pop-up bouquets, individual blooms, or floral arrangements.
- Hearts: Hearts symbolize love and affection, making them a perfect addition to a Mother’s Day card. Create pop-up hearts of various sizes and colors.
- Butterflies: Butterflies represent transformation and beauty. Create pop-up butterflies that flutter when the card is opened.
- Family Portraits: Personalize your card with a pop-up family portrait. Use photos or drawings to create a unique and sentimental keepsake.
- Hobbies and Interests: Reflect your mother’s passions by incorporating her hobbies and interests into the design. For example, if she loves gardening, create a pop-up garden scene.
- Sentimental Messages: Include a heartfelt message that pops up when the card is opened. Use calligraphy or decorative fonts to add a personal touch.
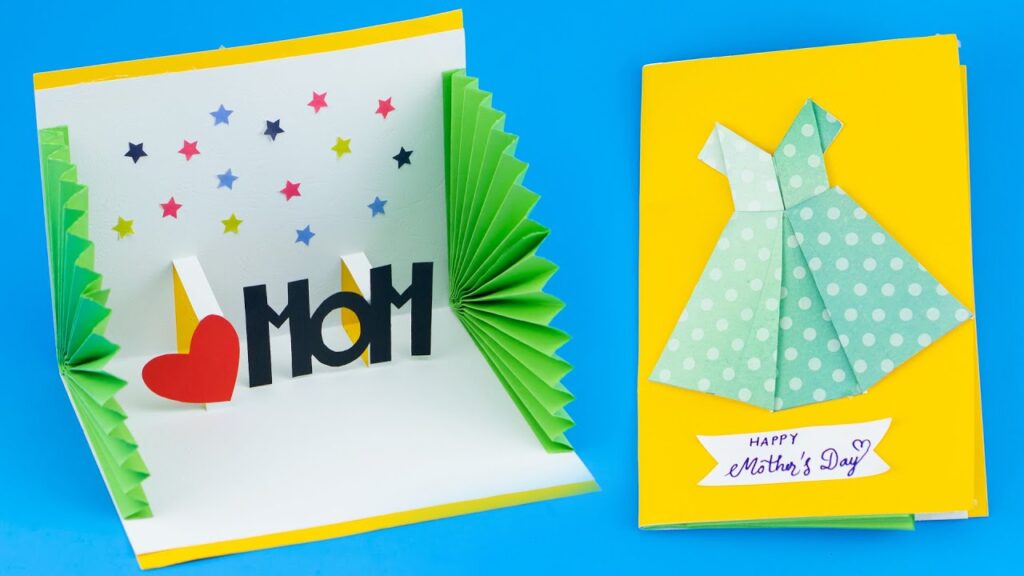
Step-by-Step Tutorial: Creating a Pop-Up Flower Bouquet Card
Let’s walk through a step-by-step tutorial for creating a beautiful pop-up flower bouquet card. This design combines several basic techniques to create a stunning and memorable gift.
- Prepare the Card Base: Fold a piece of cardstock in half to create the base of your card.
- Create the Pop-Up Mechanism: Cut two rectangles of paper and fold them in half. Make two parallel cuts along the fold line of each rectangle, creating tabs. Open the rectangles and fold the tabs outwards, creating 90-degree angles. Attach the tabs to the inside of the card, creating two pop-up platforms.
- Design the Flowers: Cut out various flower shapes from colored paper. Use different sizes and colors to create a visually appealing bouquet.
- Assemble the Bouquet: Attach the flowers to the pop-up platforms, creating a three-dimensional bouquet. Use glue or double-sided tape to secure the flowers in place.
- Add Details: Add stems and leaves to the flowers using green paper. Embellish the bouquet with ribbons, glitter, or other decorative elements.
- Write a Message: Write a heartfelt message inside the card. Use calligraphy or decorative fonts to add a personal touch.
Advanced Techniques for Pop-Up Card Mastery
Once you’ve mastered the basic techniques, you can explore more advanced methods to create intricate and elaborate pop-up designs. These techniques require more precision and patience but yield stunning results.
Curved Folds
Curved folds add a sense of fluidity and movement to your pop-up designs. Use a bone folder and a gentle hand to create smooth, curved folds. Experiment with different curves and angles to create unique shapes and effects.
Angled Pop-Ups
Angled pop-ups create a dynamic and visually interesting effect. By varying the angle of the pop-up elements, you can create a sense of depth and dimension. Use a protractor to measure and mark the angles accurately.
Layered Pop-Ups
Layered pop-ups add depth and complexity to your designs. Create multiple layers of pop-up elements that overlap and interact with each other. This technique is ideal for creating intricate scenes and landscapes.
Choosing the Right Colors and Embellishments
The colors and embellishments you choose can significantly impact the overall look and feel of your pop-up card. Consider your mother’s favorite colors and the theme of your card when making your selections.
Color Palette: Choose a color palette that is harmonious and visually appealing. Consider using complementary colors, analogous colors, or a monochromatic color scheme. Lighter colors tend to create a softer, more delicate effect, while brighter colors convey energy and excitement.
Embellishments: Embellishments add texture, sparkle, and visual interest to your card. Consider using ribbons, buttons, glitter, sequins, beads, and stickers. Experiment with different combinations to create unique and eye-catching designs.
Troubleshooting Common Pop-Up Card Making Challenges
Even experienced crafters encounter challenges when making pop-up cards. Here are some common issues and how to troubleshoot them:
- Card Doesn’t Pop Up Properly: Ensure that the pop-up mechanism is properly aligned and securely attached to the card. Check that the folds are crisp and clean.
- Pop-Up Elements are Too Fragile: Use heavier paper or cardstock for the pop-up elements to provide more stability. Reinforce the edges with glue or tape.
- Adhesive Shows Through: Use a clear-drying adhesive and apply it sparingly. Avoid using too much glue, which can cause the paper to warp or wrinkle.
- Cuts are Not Clean: Use a sharp craft knife or scalpel and a cutting mat. Replace the blade frequently to ensure clean, precise cuts.
Why a Handmade Card Shows You Care
In a world of digital communication, a handmade card stands out as a truly special and heartfelt gesture. The time and effort invested in creating a pop-up card for Mother’s Day demonstrate your love and appreciation in a tangible way. It’s a gift that will be cherished for years to come, a constant reminder of your thoughtfulness and creativity. So, gather your supplies, unleash your imagination, and create a pop-up card that will make this Mother’s Day truly unforgettable.
