Stop the Drip: Expert Guide to Fixing a Leaking Pipe Under Your Sink
Discovering a pipe under the sink is leaking can be a homeowner’s nightmare. The constant drip, drip, drip not only wastes water and increases your water bill but can also lead to significant water damage, mold growth, and costly repairs if left unattended. This comprehensive guide provides you with the knowledge and step-by-step instructions to diagnose, troubleshoot, and potentially fix a leaking pipe under your sink, empowering you to take control of the situation and prevent further damage. We’ll delve into common causes, essential tools, and proven techniques, offering insights gleaned from years of plumbing experience. Whether you’re a seasoned DIY enthusiast or a first-time homeowner, this article provides the information you need to address this common plumbing problem effectively. We aim to provide you with a resource that is not only informative but also trustworthy, ensuring you have the confidence to tackle this issue head-on.
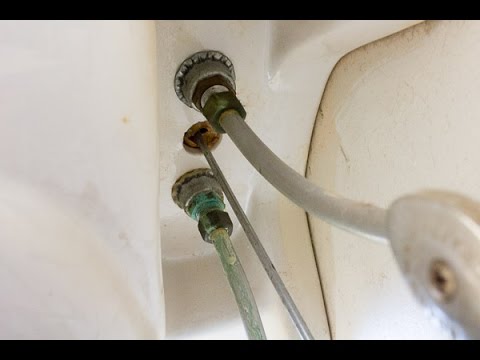
Understanding the Anatomy of Under-Sink Plumbing
Before diving into leak detection and repair, it’s crucial to understand the components of your under-sink plumbing. Familiarizing yourself with these parts will make diagnosing the source of the leak much easier.
- Supply Lines: These flexible tubes connect the shut-off valves to the faucet. They carry hot and cold water.
- Shut-Off Valves: Located under the sink, these valves control the water supply to the faucet. Knowing their location and how to use them is essential in any plumbing emergency.
- P-Trap: The curved pipe under the sink that holds water, preventing sewer gases from entering your home. This is a common location for leaks.
- Drainpipe: The pipe that carries wastewater away from the sink and connects to the main drain line.
- Tailpiece: The pipe that connects the sink drain to the P-trap.
- Fittings: Connectors like couplings, nuts, and washers that join different pipes and components.
Understanding how these components connect and function is the first step toward successfully addressing a leaking pipe.
Identifying the Source of the Leak
Pinpointing the exact location of the leak is critical for effective repair. A methodical approach is key.
- Dry the Area: Use a clean cloth or paper towels to thoroughly dry all pipes, fittings, and the surrounding area under the sink.
- Observe Carefully: After drying, closely watch for the first signs of water. A flashlight can be helpful for spotting small drips.
- Trace the Water: Follow the water trail upwards to its source. Common leak locations include:
- Connections: Check all connections between pipes and fittings. Look for drips or moisture around nuts and couplings.
- P-Trap: Examine the P-trap for cracks or leaks, especially at the joints.
- Supply Lines: Inspect the supply lines for any signs of damage, such as cracks, bulges, or corrosion.
- Faucet Base: Leaks around the base of the faucet can sometimes travel down the pipes, making it seem like the leak is originating from under the sink.
- Use Paper Towels: Wrap small pieces of paper towel around connections and pipes to help identify the source of the leak. The paper towel will absorb the water, making it easier to see where it’s coming from.
Careful observation and a systematic approach will help you accurately identify the source of the leak.
Essential Tools and Materials for Pipe Repair
Having the right tools and materials on hand will make the repair process much smoother and more efficient.
- Basin Wrench: Used to loosen and tighten nuts in tight spaces, such as under the sink.
- Pipe Wrench: For gripping and turning pipes.
- Adjustable Wrench: A versatile wrench for various plumbing tasks.
- Channel-Lock Pliers: Useful for gripping and holding pipes and fittings.
- Screwdrivers: Both Phillips head and flathead screwdrivers may be needed.
- Plumber’s Tape (Teflon Tape): Used to seal threaded connections.
- Plumber’s Putty: For sealing around drains and faucets.
- Replacement Parts: Have replacement washers, O-rings, and pipes on hand, if possible.
- Bucket: To catch water.
- Towels or Rags: For cleaning up spills.
- Safety Glasses: To protect your eyes.
- Gloves: To protect your hands.
Investing in a basic plumbing toolkit will prepare you for common plumbing repairs around your home.
Step-by-Step Guide to Repairing Common Leaks
Once you’ve identified the source of the leak and gathered your tools, you can begin the repair process. Here are some common leak scenarios and how to address them:
Leaking Connection
- Turn off the Water: Shut off the water supply to the sink using the shut-off valves.
- Loosen the Nut: Use a wrench to carefully loosen the nut connecting the leaking pipe.
- Inspect the Washer: Remove the nut and inspect the washer or O-ring for damage. Replace if necessary.
- Apply Plumber’s Tape: If the threads are worn, wrap them with plumber’s tape.
- Reassemble: Reattach the nut and tighten it securely, but don’t overtighten.
- Turn on the Water: Slowly turn the water supply back on and check for leaks.
Leaking P-Trap
- Turn off the Water: Shut off the water supply to the sink.
- Place a Bucket: Position a bucket under the P-trap to catch any water.
- Loosen the Slip Nuts: Use channel-lock pliers to loosen the slip nuts on either side of the P-trap.
- Remove the P-Trap: Carefully remove the P-trap, emptying any remaining water into the bucket.
- Inspect the P-Trap: Check the P-trap for cracks or damage. If damaged, replace it with a new one.
- Clean the Components: Clean the P-trap and tailpiece with a brush to remove any debris.
- Reassemble: Reattach the P-trap, ensuring the slip nuts are tightened securely.
- Turn on the Water: Slowly turn the water supply back on and check for leaks.
Leaking Supply Line
- Turn off the Water: Shut off the water supply to the sink.
- Disconnect the Supply Line: Use a wrench to disconnect the supply line from both the shut-off valve and the faucet.
- Inspect the Supply Line: Check the supply line for any signs of damage, such as cracks, bulges, or corrosion. If damaged, replace it with a new one.
- Install a New Supply Line: Attach the new supply line to the shut-off valve and the faucet, ensuring the connections are tight.
- Turn on the Water: Slowly turn the water supply back on and check for leaks.
These are just a few common leak scenarios. Always exercise caution and consult a professional plumber if you’re unsure about any step in the repair process.
Knowing When to Call a Professional Plumber
While many minor leaks can be repaired by homeowners, there are situations where it’s best to call a professional plumber.
- Extensive Damage: If the leak has caused significant water damage, mold growth, or structural damage, it’s important to consult a professional.
- Complex Plumbing Systems: If you have a complex plumbing system or are unsure about any aspect of the repair, it’s best to leave it to the experts.
- Persistent Leaks: If you’ve tried to repair the leak yourself and it continues to persist, it’s time to call a professional.
- No Experience: If you don’t have experience in plumbing repair, it’s best to avoid attempting the repair yourself.
Attempting to repair a leak yourself can sometimes make the problem worse. Consulting a professional plumber can ensure that the repair is done correctly and prevent further damage.
Preventative Measures to Avoid Future Leaks
Taking preventative measures can help you avoid future leaks and maintain the health of your plumbing system.
- Regular Inspections: Regularly inspect your under-sink plumbing for any signs of leaks or damage.
- Tighten Connections: Periodically tighten the connections on pipes and fittings to prevent leaks.
- Replace Worn Parts: Replace worn washers, O-rings, and supply lines before they fail.
- Avoid Harsh Chemicals: Avoid using harsh chemicals that can corrode pipes and fittings.
- Proper Drainage: Ensure that your sink drains properly to prevent clogs and pressure buildup.
By taking these preventative measures, you can extend the life of your plumbing system and avoid costly repairs.
The Role of Plumbing Insurance and Warranties
Understanding your plumbing insurance coverage and any applicable warranties can provide peace of mind and financial protection in case of a major plumbing issue.
- Homeowner’s Insurance: Check your homeowner’s insurance policy to see if it covers plumbing leaks and water damage.
- Plumbing Warranties: If you’ve recently had plumbing work done, check to see if the work is covered by a warranty.
- Appliance Warranties: Check the warranties on your appliances, such as dishwashers and garbage disposals, to see if they cover plumbing-related issues.
Knowing your coverage and warranties can help you avoid unexpected expenses in the event of a plumbing emergency.
Innovative Plumbing Solutions for Leak Prevention
The plumbing industry is constantly evolving, with new technologies and solutions emerging to help prevent leaks and improve water conservation. One such innovation is the use of smart water leak detectors.
Smart Water Leak Detectors: A Proactive Approach
Smart water leak detectors are devices that can be installed near potential leak sources, such as under sinks, near toilets, and around water heaters. These devices use sensors to detect moisture and send alerts to your smartphone or other devices when a leak is detected. Some advanced models can even automatically shut off the water supply to prevent further damage.
Key Benefits of Smart Water Leak Detectors:
- Early Leak Detection: Detect leaks early, before they cause significant damage.
- Remote Monitoring: Monitor your plumbing system remotely, even when you’re away from home.
- Automatic Shut-Off: Automatically shut off the water supply to prevent further damage.
- Water Usage Monitoring: Track your water usage to identify potential leaks or inefficiencies.
These devices are an increasingly popular way to protect your home from water damage and conserve water.
Expert Advice for a Dry Kitchen Space
Dealing with a pipe under the sink is leaking can be frustrating, but with the right knowledge and tools, you can often resolve the issue yourself. Remember to prioritize safety, take your time, and don’t hesitate to call a professional when needed. By understanding the components of your under-sink plumbing, identifying the source of the leak, and following the step-by-step repair guides, you can confidently tackle this common plumbing problem. Furthermore, preventative measures and innovative solutions like smart water leak detectors can help you avoid future leaks and maintain a healthy plumbing system. With a proactive approach, you can ensure a dry and worry-free kitchen space for years to come.
