Mastering Glock 19 Disassembly: A Step-by-Step Guide to Slide Removal
Learning how to remove the slide from your Glock 19 is a fundamental skill for any Glock owner. Whether you’re cleaning your pistol, performing maintenance, or installing aftermarket parts, understanding the disassembly process is crucial for safety and proper firearm function. This comprehensive guide will provide you with a detailed, step-by-step walkthrough, ensuring you can confidently and safely disassemble your Glock 19. We’ll cover everything from basic safety precautions to troubleshooting common issues, giving you the knowledge and skills you need to maintain your firearm effectively. Our goal is to provide you with a resource that reflects the importance of responsible gun ownership and safe handling practices.
Understanding the Glock 19 and Its Disassembly
The Glock 19 is a widely popular semi-automatic pistol known for its reliability, simplicity, and ease of maintenance. Its design emphasizes straightforward disassembly, making it relatively easy for owners to perform basic cleaning and maintenance. Understanding the inner workings of your Glock 19 begins with knowing how to safely disassemble it. This process allows you to access and clean critical components, ensuring proper function and longevity. The disassembly process involves removing the slide assembly from the frame, which provides access to the barrel, recoil spring assembly, and firing pin assembly.
Glock pistols, including the Glock 19, operate on a simple principle: a striker-fired mechanism with a polymer frame. This design contributes to its lightweight and durable nature. The slide, typically made of steel, houses the firing pin, extractor, and other essential components. Removing the slide allows for thorough cleaning of these parts, preventing malfunctions caused by fouling or debris. Proper maintenance, including regular cleaning and lubrication, is essential for maintaining the reliability and accuracy of your Glock 19.
The Glock 19’s disassembly process has remained largely consistent since its introduction. The simplicity of the design is a key factor in its popularity among law enforcement, military personnel, and civilian shooters. The ability to quickly and easily disassemble the pistol in the field is a significant advantage in various situations. However, it’s crucial to emphasize that safety should always be the top priority when handling any firearm, including the Glock 19.
Essential Safety Precautions Before Disassembly
Before you even think about removing the slide from your Glock 19, you must adhere to strict safety protocols. These steps are not optional; they are essential for preventing accidental discharges and ensuring your safety and the safety of those around you.
- Always Treat Every Firearm as Loaded: Even if you believe the firearm is unloaded, treat it as if it is loaded. This mindset will help you avoid complacency and maintain a safe handling procedure.
- Point the Firearm in a Safe Direction: Ensure the muzzle is pointed in a direction where an accidental discharge would not cause injury or damage. A designated safe direction is typically a bullet-resistant backstop or an area free from obstructions and people.
- Remove the Magazine: Depress the magazine release button and remove the magazine from the pistol. Visually inspect the magazine well to ensure it is empty.
- Rack the Slide Multiple Times: Firmly grasp the slide and rack it several times to eject any rounds that may be in the chamber. Visually and physically inspect the chamber to confirm it is empty.
- Visually and Physically Inspect the Chamber: Look into the chamber to ensure no rounds are present. Use your finger to physically feel the chamber to confirm it is empty. Do this even if you have already racked the slide.
These safety checks should be performed every single time you handle your Glock 19, regardless of whether you are disassembling it for cleaning, maintenance, or any other purpose. Never skip these steps, and always double-check to ensure the firearm is unloaded before proceeding. Failing to follow these safety precautions could lead to serious injury or even death.
Step-by-Step Guide: Removing the Slide from a Glock 19
Now that you’ve taken the necessary safety precautions, you can proceed with the disassembly process. Follow these steps carefully to remove the slide from your Glock 19 safely and effectively:
- Ensure the Firearm is Unloaded: Repeat the safety checks outlined above to confirm the firearm is unloaded.
- Grip the Slide: Firmly grip the slide with your dominant hand.
- Pull the Slide Back Slightly: Pull the slide back approximately 1/8 to 1/4 of an inch. This will align the slide stop lever with the corresponding notch in the slide.
- Depress the Slide Stop Lever: Use your non-dominant hand to simultaneously pull down on both sides of the slide stop lever. This lever is located on the frame, just above the trigger guard.
- Pull the Trigger (While Holding the Slide Stop Down): While holding the slide stop lever down, gently pull the trigger. This will release the slide, allowing it to move forward off the frame.
- Guide the Slide Forward: Carefully guide the slide forward off the frame. Be mindful of the recoil spring assembly, which may come loose as the slide is removed.
Once the slide is removed, you can proceed with cleaning and maintenance. Remember to keep the muzzle pointed in a safe direction throughout the entire process. If you encounter any resistance or difficulty during disassembly, stop and re-evaluate the steps. Do not force any parts, as this could damage the firearm.
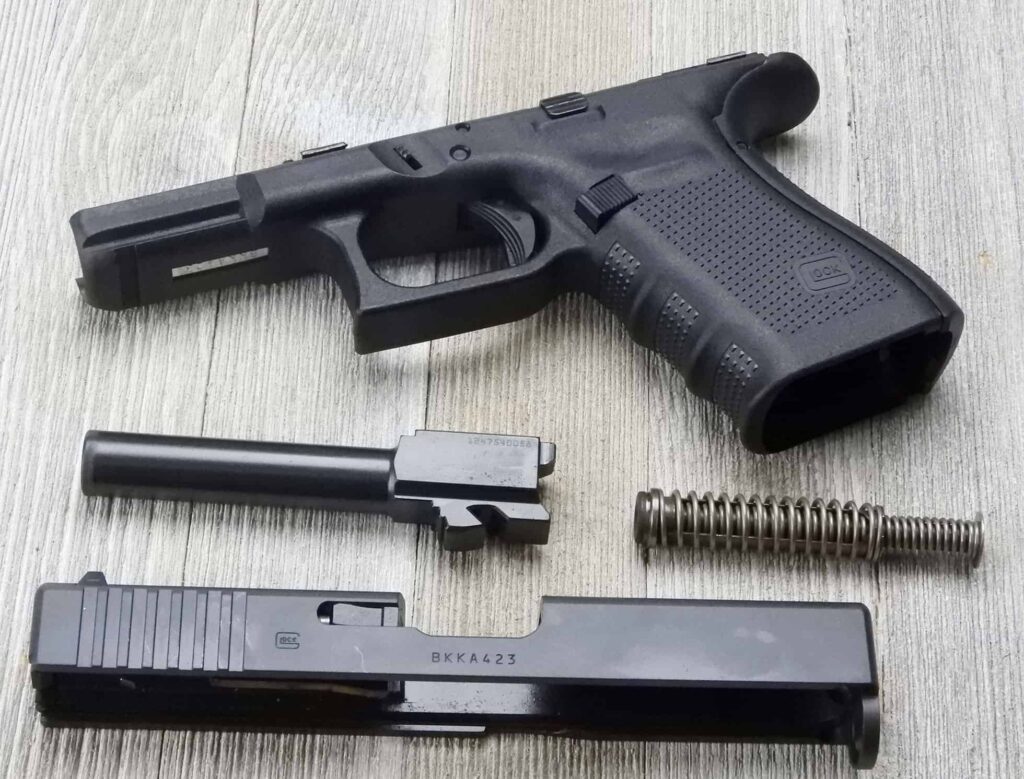
Detailed Breakdown of the Slide Assembly
After removing the slide from your Glock 19, it’s beneficial to understand the components within the slide assembly. This knowledge will aid in cleaning, maintenance, and troubleshooting.
- Barrel: The barrel is the component through which the bullet travels. It’s crucial to keep the barrel clean and free from obstructions to ensure accuracy and proper function.
- Recoil Spring Assembly: This assembly consists of the recoil spring and guide rod. It absorbs the recoil energy during firing and returns the slide to its forward position. Inspect the recoil spring for signs of wear or damage and replace it as needed.
- Firing Pin Assembly: The firing pin assembly includes the firing pin, firing pin spring, and firing pin safety. This assembly is responsible for igniting the primer of the cartridge. Ensure the firing pin channel is clean and free from debris.
- Extractor: The extractor is a small, hook-shaped part that removes spent casings from the chamber after firing. Ensure the extractor is clean and moves freely.
- Slide Cover Plate: The slide cover plate retains the firing pin assembly within the slide.
Understanding the function of each component within the slide assembly is essential for proper maintenance and troubleshooting. Refer to your Glock 19 owner’s manual for detailed diagrams and instructions.
Reassembling Your Glock 19: A Step-by-Step Guide
Once you’ve completed your cleaning or maintenance tasks, it’s time to reassemble your Glock 19. Follow these steps carefully to ensure proper reassembly:
- Install the Recoil Spring Assembly: Insert the recoil spring assembly into the corresponding hole in the front of the slide. Ensure the spring is properly seated.
- Insert the Barrel: Insert the barrel into the slide, ensuring it is fully seated and the locking lugs are aligned.
- Align the Slide with the Frame: Position the slide over the frame, aligning the rails on the slide with the corresponding grooves on the frame.
- Slide the Slide Backwards: Push the slide backwards onto the frame until it clicks into place.
- Function Check: Perform a function check to ensure the pistol is functioning correctly. Rack the slide, pull the trigger (while pointing in a safe direction), and ensure the firing pin is released.
After reassembling your Glock 19, always perform a function check to confirm that all parts are properly installed and the pistol is functioning as intended. If you encounter any issues during reassembly, consult your owner’s manual or seek assistance from a qualified gunsmith.
Common Issues and Troubleshooting
While the Glock 19 is known for its reliability, you may encounter some common issues during disassembly or reassembly. Here are some troubleshooting tips:
- Slide Won’t Come Off: Ensure the slide is pulled back to the correct position, and the slide stop lever is fully depressed. Also, make sure you are pulling the trigger while holding the slide stop down.
- Recoil Spring Assembly is Difficult to Install: Ensure the recoil spring assembly is properly oriented and fully seated in the slide.
- Slide Won’t Go Back On: Check for any obstructions or misalignments. Ensure the rails on the slide are properly aligned with the grooves on the frame.
If you are unable to resolve any issues, consult your owner’s manual or seek assistance from a qualified gunsmith. Do not force any parts, as this could damage the firearm.
The Importance of Regular Cleaning and Maintenance
Regular cleaning and maintenance are essential for maintaining the reliability and accuracy of your Glock 19. Fouling, dirt, and debris can accumulate over time, leading to malfunctions and reduced performance. Cleaning your Glock 19 after each shooting session is highly recommended. This will help prevent the buildup of carbon and other contaminants. Lubricate the moving parts of your Glock 19 with a high-quality gun oil to ensure smooth operation. Follow the manufacturer’s recommendations for lubrication points and frequency. Inspect your Glock 19 regularly for signs of wear or damage. Replace any worn or damaged parts promptly to prevent malfunctions. A well-maintained Glock 19 will provide years of reliable service.
Choosing the Right Cleaning Supplies
Selecting the right cleaning supplies is crucial for effectively maintaining your Glock 19 without causing damage. Here are some essential cleaning supplies:
- Gun Cleaning Solvent: A quality gun cleaning solvent is essential for removing fouling, carbon, and other contaminants from the firearm.
- Gun Oil: Gun oil is used to lubricate the moving parts of the firearm, ensuring smooth operation and preventing corrosion.
- Cleaning Patches: Cleaning patches are used to apply solvent and oil to the firearm.
- Bore Brush: A bore brush is used to scrub the inside of the barrel, removing fouling and debris.
- Cleaning Rod: A cleaning rod is used to push the cleaning patches and bore brush through the barrel.
- Soft Cloths: Soft cloths are used to wipe down the exterior of the firearm.
When choosing cleaning supplies, select products specifically designed for firearms. Avoid using abrasive cleaners or solvents that could damage the finish of your Glock 19.
Advanced Maintenance and Upgrades
Beyond basic cleaning and maintenance, you may consider performing advanced maintenance or upgrades on your Glock 19. These tasks may include replacing the recoil spring, installing aftermarket triggers, or upgrading the sights. If you are not comfortable performing these tasks yourself, seek assistance from a qualified gunsmith. Improper installation of aftermarket parts could damage your firearm or compromise its safety. Always consult your owner’s manual and follow the manufacturer’s instructions when performing any maintenance or upgrades.
Safe Storage Practices for Your Glock 19
Proper storage of your Glock 19 is essential for preventing unauthorized access and ensuring the safety of your family and community. Here are some safe storage practices:
- Store Unloaded: Always store your Glock 19 unloaded.
- Use a Gun Safe or Lock Box: Store your Glock 19 in a gun safe or lock box to prevent unauthorized access.
- Store Ammunition Separately: Store ammunition in a separate location from the firearm.
- Keep Out of Reach of Children: Ensure your Glock 19 is stored in a location that is inaccessible to children.
Following these safe storage practices will help prevent accidents and ensure the responsible ownership of your Glock 19.
Responsible Ownership and Continued Learning
Understanding how to remove the slide from your Glock 19 is just one aspect of responsible gun ownership. It’s crucial to continuously educate yourself on firearm safety, maintenance, and legal regulations. Participate in training courses, read reputable sources, and seek guidance from experienced shooters. Responsible gun ownership is a lifelong commitment that requires ongoing learning and dedication. By prioritizing safety, practicing responsible handling, and continuously expanding your knowledge, you can contribute to a safe and responsible gun culture. Remember to always prioritize safety, follow all applicable laws and regulations, and seek guidance from qualified professionals when needed. Your commitment to responsible gun ownership will help ensure the safety and well-being of yourself and those around you.
